Halloween Costume Inspiration: Little Ladybug Hair Bows!
These hair bows are my favorite part of the Little Ladybug costume. These would also work well for a butterfly costume or a bumble bee. How cute would these be in yellow and black?!
Rather than having a ladybug headband, I opted to make two matching bows because my little one will not keep a headband in her hair. It's also a little different and very adorable.
I have to apologize for my pictures. I could not get my 22 month-old ladybug model to hold still, but I think you get the idea, right? The great thing about these bows is that the buggy antennae are removable, so after Halloween is over, you can still use them!
If you are not making a ladybug, butterfly, or bee costume, this is still a great hair bow tutorial, so keep reading. Just leave off the antennae part.
These bows are easy to make. The hardest part is getting your toddler to let you fix her hair into piggies and then actually putting the bows into her hair. If you can do that, then you can make these bows!
Supplies:
Ribbon (I used 7/8" red with black polka dots grossgrain and 5/8" red sheer with glitter dots--both from Hobby Lobby. You could add more layers of ribbon to your taste.)
Needle and Thread
Scissors
Straight Pin
Hot Glue Gun
2 Black Chenille Stems (or pipe cleaners, I used the wider kind)
4 Black Pom-Poms
2 Alligator Clips
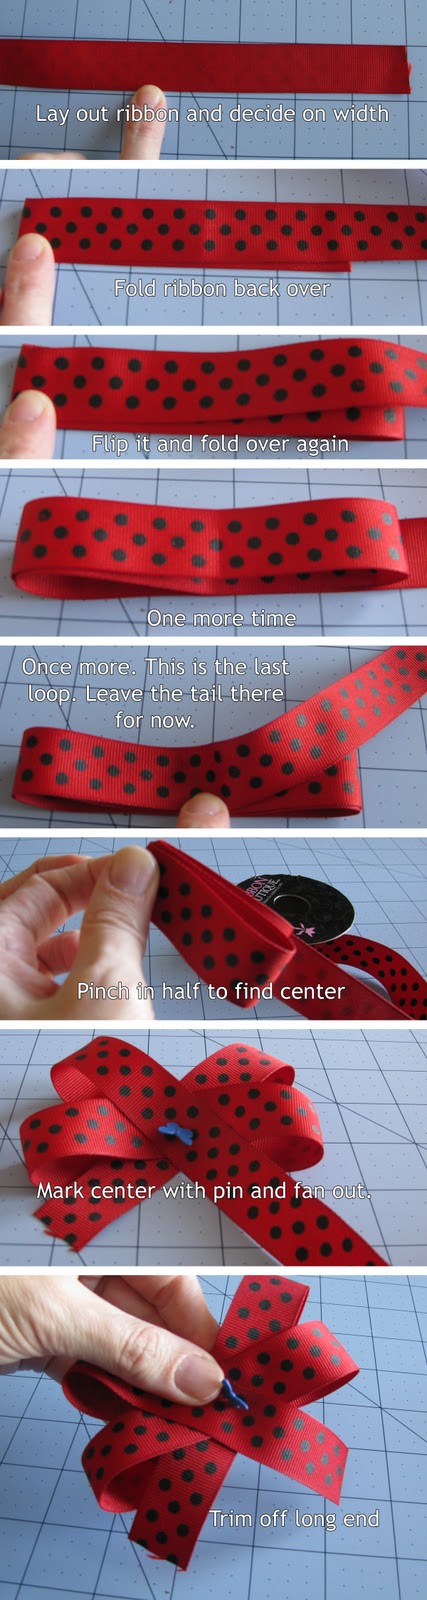
For the base of the bow, make a basic boutique bow. Usually when I make a boutique bow, I don't worry too much about measuring. But for these, you are making two bows that are the same size, so I recommend measuring. I made mine 4.5" wide. I have my own method for making these, and the great thing is you don't have to pre-cut your ribbon and guess how much ribbon you need for the length of loops etc. Here is my method for the first few steps.
Set your ribbon aside and thread a needle. The thread color doesn't matter much because it will be covered up. You'll want a fairly long piece of thread.
Baste stitch through the layers along center line.
Carefully pull the thread to gather and wrap around center several times. Leave thread and needle attached.
Cut out two same length accent ribbon pieces about the width of your bow. Heat seal the ends. Secure in an x with a very small (like tiny) dab of hot glue. Set on top of bow and wrap thread around to hold it onto bow.
Here you can add as many layers as you like. I only added one extra layer to keep it simple, but it's fun to add 3 or 4 (or more) layers depending on the bow you are making. I used lots of layers on my funky Halloween bow (example below). They can get thick quickly, and you need a very long piece of thread if you do this.
Back to the ladybug bow...
For center of bow, tie another ribbon in a knot. Place a dot of glue under the know and attach it to the center.
Glue center ribbon to the back of the bow and then trim off the long end.
Line an alligator clip.
Glue clip to back of bow. Don't apply glue to the part of clip that you pinch, otherwise it's too hard to place in the hair.
Trim and heat seal the ends (if you haven't already done so).
Now here is the fun part, adding the antennae. For each antennae, you need one chenille stem and two pom-poms.
Apply glue to one side of a pom-pom and press tip of stem into the glue.
Repeat with other pom-pom.
Squeeze pom-poms together. This secures them to the chenille stem.
About half-way down the stem, clip the bow on the stem.
Fold stem in half, up around the top of the bow.
Twist the chenille stem around itself. This secures it to the bow, but also makes it removable so you can reuse your bow later.
Make another bow to match and you are done!
Check out my other tutorials for the
skirt,
wings, and
trick-or-treat bag.


