October 25, 2011

Guest Post at Young and Crafty!

Today I am so happy to be guest posting at Young and Crafty. It is the hair bow tutorial for the Little Ladybug Costume. Check it out!

Aren't those the cutest little ladybug antennae you have ever seen?

October 21, 2011

Frosted Peanut Butter Cup Cookies


If you are a chocolate and peanut butter lover, watch out. This recipe combines three of my favorite things. Soft peanut butter cookies, Reese's peanut butter cups, and chocolate frosting. The peanut butter cup is hidden inside the cookie and is a delightful surprise when you take a bite. I use the full sized cups and cut them into fourths. Or, you can use the miniature Reese's pb cups, one per cookie. But those require lots of unwrapping, which is why I use the bigger cups. You can also buy unwrapped pb cups that are in the baking section. I have also hidden candy kisses inside, and that is delicious too. So whatever you prefer, or have on hand to go inside will work great.

To start things off, you need a good peanut butter cookie recipe. I have tried many over the years and this one is my favorite by far. The recipe comes from my husband's grandmother, whom I never had the privilege of meeting. She loved to bake and sew. I know I would have adored her. So, when I discovered her peanut butter cookie recipe, I knew I needed to try it. I was delighted. They turned out to be the perfect peanut butter cookie. They are soft and melt in your mouth, you can't have just one! Her recipe does not call for the frosting or peanut butter cups, those are my additions and they take the perfect cookies over the edge into scrumptiously gourmet!

Here is what you need:


Cut 3 peanut butter cups (per batch) into fourths. Set aside. This recipe yields 2 dozen cookies. So if you are doing that many you will need to cut 6 pb cups.


Cream together peanut butter and butter until they are a uniform color.


Add sugars. Cream together.


Add egg and vanilla.


Sprinkle in baking soda and salt, then mix. I like to do this rather than mix the salt and soda with my flour. One less dish to dirty and it gets mixed in just fine this way.


Add your flour.


I like to use a scoop to form my cookies. That way they are all uniform in size and bake evenly.


Scoop 12 cookie dough shapes onto your cookie sheet. I like to use my silpat.


Press a 1/4 pb cup into each cookie dough shape.


Pinch dough up and around the top of the pb cup so that the cup is hidden under the dough.
Bake @ 350 for 10-12 minutes. I bake my for exactly 12 minutes and they come out perfectly!

While these are in the oven, you can whip up your chocolate frosting.


Here they are right out of the oven.


Broken in half to reveal the chocolaty surprise in the middle. They are divine, just like this. You could totally stop right here and just eat them. Adding the frosting is so delicious though. And if you are bringing them to a party, they are show stoppers. Who could pass by this?


People who are allergic to peanut butter. That's who. Everyone else will be taking one and they will disappear right before your eyes. That is assuming they even make it to the party and you and your kids don't eat them all first!


So for the final step, frost the cookies. Then for fun, sprinkle some crushed pb cups on top for a garnish. They make them look extra tempting and taste delicious too. Here's the recipe. And at the very bottom, I have included a link to download a cute 4x6 recipe card. Enjoy!

Frosted Peanut Butter Cup Cookies

Cookie Dough Recipe:

1/2 cup peanut butter
1/2 cup butter
1/2 cup sugar
1/2 cup brown sugar
1 egg
1 tsp vanilla
3/4 tsp baking soda
1/4 tsp salt
1 1/4 cup flour
6 - 8 regular sized peanut butter cups cut into fourths

1. Cut peanut butter cups into fourths. Set aside.
2. Cream together peanut butter and butter. 
3. Add sugars
4. Add egg and vanilla
5. Sprinkle in baking soda and salt
6. Add flour
7. Scoop 12 equally sized balls. Press a fourth of a peanut butter cup into each ball. Pinch dough up and over each cup so that it is covered.
8. Bake @ 350 10-12 minutes
9. Cool. Frost.
10. Sprinkle broken up pb cup candy pieces on top for garnish.
yields 2 dozen cookies.

Chocolate Frosting Recipe:

1/3 cup cocoa
3 cups powdered sugar
6 tablespoons butter
1 tsp vanilla
3 or 4 tablespoons milk

1. Combine cocoa and sugar. 
2. Add butter, vanilla. 
3. Add milk one tablespoon at a time until desired consistency is reached.
Here is the recipe card. Just click on the caption below the photo. Remember, this is for personal use only. Thanks!

Link to Download Recipe Card


October 18, 2011

How to Line an Alligator Clip

This might seem obvious, but here is my method. The clip is 1 3/4" and I bought a box of 100 at Sally's for about $6.


I dislike alligator clips that are completely covered in ribbon. These, I have found, are very difficult to actually clip into the hair. That I why I leave the bottom metal exposed. Also, lining you alligator clips makes them easier to attach to bows and has a more finished look. I've used grosgrain and satin ribbons. I don't think it matters. Actually, I use the least expensive ribbon that I have that matches.

October 17, 2011

Homemade Ruffle Skirt for Halloween

It all started with a pair of leggings.

I bought them at Swiss Days in September. They needed something really cute to go with them. So to my Pinterest board I went for inspiration. 
I found two that I really liked. One here and another here.

I combined tecniques from both to create this adorable skirt for my 22 month-old daughter. I didn't take pictures of each step, but you can read the other tutorials (both are excellent) to help you figure out how to make this. 

I used an old t-shirt from my 4 year old son that was green to go underneath. This was the perfect size for the underskirt. I liked using a t-shirt because that means no hemming the bottom and no sewing and underskirt.

Rather than hem my ruffle layers, I folded them in half. I hate to hem. My hems never come out even and I always burn my fingers with the iron. So, I'd rather get a tad extra fabric to avoid hemming altogether. 

Once you finish sewing all your ruffles to the underskirt. You need to make a casing and add the elastic. This is a heavy skirt, so I made the elastic a bit snugger than usual to hold it up.


I found the matching shirt at Walmart. It had all the colors I wanted.


Then I made this funky Halloween bow to match.


There was just enough fabric left over to make a baby skirt. So I decided to whip one up for my brand new niece. I attached it to a onesie and made another smaller bow using the same ribbons.


This would be fun to do for any holiday. I'm thinking of making something similar for Christmas. I hope you've been inspired!


October 15, 2011

Halloween Costume Inspiration: Little Ladybug Skirt


So far I've shown you how to make the Little Ladybug wings and bag. Now it's time for the skirt.

Every little ladybug needs a skirt to twirl! Here is mine. Really it is so very simple. I already had this skirt. It was purchased at Old Navy. I have seen red pettiskirts all over the place. Right now they are at my local Costco. I saw one at Gymboree the other day. You can also find them at various sites online. 

I used sequins for the spots. Originally, I was going to cut them out of felt, which would totally work. But my 7 year-old convinced me to buy the sequins at the craft store. I am so glad he did. They are already cut out and ready to go. They only cost $1. Plus they add some shine to the costume, which is fun. They have little holes on top, so when I first started, I began sewing them on by hand. I quickly realized that sewing was going to take FOREVER. It's a Halloween costume after all, so gluing rather than sewing is just fine!

Here is how you make it into a ladybug skirt:
Supplies:
Red tutu or pettiskirt
Sequins
Hot Glue gun--lo temp!

1. Attach sequins to skirt using a hot glue gun, in a pleasing pattern. Make sure the glue gun is low temp because you are gluing it so such thin fabric (otherwise, your fingers will be blistered!). I only glued the sequins to the top layer.

That's it. Easy right? It does take a bit of time. I got out the extension cord. made myself comfortable and glued these on while sitting on the couch watching a favorite TV show after my kids were all in bed.

October 14, 2011

Halloween Costume Inspiration: Little Ladybug Trick-or-Treat bag

This bag came out so much cuter than I could have predicted. My 22 month-old daughter loves it and calls it a purse. I made it using the leftover fabric from the wings. I am keeping it nice until Halloween, but after that I plan to let her use it whenever she wants.

I don't have pictures of each step, but I do have a detailed tutorial on how to make a trick-or-treat bag.  If you are confused about the steps refer to that tutorial. One main difference is that working with felt is so much easier. You don't have to press or hem anything.


Supplies:
Red Felt
Black Felt (we used sparkly)
Black Ric Rac
Hot glue gun and sewing machine, black or red thread.
1. Cut out two pieces of red felt. I cut my 10"x10" which is a perfect size for a toddler.
2. Cut out a strap. I cut mine 2"x19" I wanted it to fit over her shoulder, like a purse. And I only did one strap on this bag. You could do two straps and make them shorter to be hand held instead.
3. Hot glue ric-rac along the top edge of each fabric piece allowing a bit to hang over the edge on each side.
4. Place two felt pieces together with the ric-rac to the inside. Sew along 3 sides. Trim ric-rac
5. **optional. Pinch corners into a triangle and sew a straight line to make the bag more of a rectangular box shape (please see my trick-or-treat bag tutorial. **Refer to the optional steps)
6. Leaving bag wrong side out, pin the strap to sides of bag about an inch from the top. Sew a rectangle to hold it in place.
7. Trace several circles in the black felt. My bag has 12 spots. I traced a lid for my pattern and used a white crayon to trace on the wrong side. Arrange the spots in a pleasing pattern (the felt sticks to each other)
8. Hot glue the spots in place. And now you are done!!


And here is the only picture I got of my busy toddler holding the bag, looking at the camera, AND smiling. Of course, I had the setting on manual focus and was NOT quick enough to change the settings and capture the moment. Try as I might, I did not get a second chance at this shot. Oh well. You can kind of tell how cute she is ;)


Stay tuned for the tutorials on the bows. Here are instructions for the wings and skirt!


October 13, 2011

Halloween Costume Inspiration: Little Ladybug Wings

My daughter's Halloween costume turned out so cute, that I thought I would share some tips on how I made it all. First off, I will tell you how I made the wings, or as my 22 month-old called them her "backpack." Check back for instructions on the skirt and ladybug trick-or-treat bag! The hair bow instructions will be posted toward the end of the month.


I wanted the wings, or shell, to be realistic. So that meant no fairy or butterfly type wings that I saw on some store bought versions.

 I found inspiration at the Family Fun website here and here.

I didn't follow their steps exactly. I apologize for not taking pictures along the way. But it's not too hard to figure out. Here is what I did.

Supplies:
Red felt (I bought a yard and it was way too much. I used the extra to make a matching trick-or-treat bag. Maybe 1/2 or 3/8ths would be better.)
Black Felt (Hobby Lobby has sparkly felt in sheets. I bought 3 sheets of black sparkly and one sheet plain)
Cardboard from cereal box
Polyester Stuffing
1 yard 3/4" elastic
Scissors, hot glue gun, sewing machine, needle and thread (in red)


1. Find a large platter or bowl in a circle or oval shape for your pattern. Trace on felt 2 red circles (I used a black pen to trace). The size of platter you use will depend on how big your trick-or-treater is. My circle was approximately 16"
2. Cut out 2 large red circles Cut one of the red circles in half (to make the open wing look)
3. Disassemble cereal box so that it's flat. Using your pattern cut a circle out of cardboard then trim about 1" off the entire circumference.
4. Find a cup or smaller round object for your pattern for the black dots. Cut out 6 black dots out of the black sparkly felt.
5. Lay out your red circle that is not cut in half. 
6. Lay out your two circle halves on top until you like the look of the "wings" and so it lines up with the red circle.
7. Tuck plain black felt behind the circle halves. Trim bottom to make it rounded.
8. Using hot glue gun, glue together circle halves, plain black felt piece, and attach sparkly circles in a pleasing pattern
9. Turn the wings so that it is right sides together with the other circle. Sew all around the circle leaving a 3-4" opening in the bottom
10. Turn it right sides out. 
11. Using the opening in the bottom roll up cereal box and place it inside the wings.
12. Making sure the cardboard is on the bottom of the wings (plain red side) add stuffing until the wings are nice and rounded.
13. Hand sew opening closed.
For the Arm straps:
1. Measure your trick-or-treater's arms to know how big to make straps Add 1 inch for comfort and cut 2 lengths of elastic.
2. Make 2 casings for the elastic out of red felt that is a few inches longer than your elastic.
3. Sew casings. Turn casings right side out. See my Trick-or-Treat bag tutorial for detailed instructions on casings (the step where you make the strap).

Here are the steps:

4. Thread the elastic through the casing. And zig-zag stitch the elastic to each end of the casing. The red felt should be gathered.
5. Hot glue the arm straps to the back of the wings/shell.  I added a strip of red felt where the straps connected with itself for extra security, you can see it in the photo. I found that the hot glue holds up great with felt. If you don't want to glue the straps on, you could sew them on instead.


And you're done! Hopefully, between my directions, and the other tutorials on Family Fun, I'm sure you can figure it out. Like I said, stay tuned for instructions on the hair bows, skirt, and ladybug bag!


October 12, 2011

Freebie! Halloween Treat Bag Topper Printable

I found these fun Halloween treat bags at the grocery store and thought it would be fun to create a treat bag topper to match. I loved the shape of the bag. See my previous post about treat bag toppers to know how to use them.


I am happy to share this topper with you. There is a 5x7 size for the 5" bags and a 4x6 size for the 4" bags.

Just click on the captions below the picture to download the full resolution toppers.
Enjoy!
Note: These are for personal use only. Thanks.

4x6 Topper
5x7 Topper

Credits:
Fonts: LD Spray Stencil, LD Red Hatters Hand, LD Twylight

October 11, 2011

Melted Flower Tutorial


I realize that there are lots of tutorials about how to make satin flowers on the internet, but I have figured out a cutting method that greatly simplifies the process!


Supplies:
Synthetic Fabric (the shiny kind)
Sharp Scissors
Rotary Cutter, Mat, and Ruler
Candle and Lighter or Matches
Hot Glue Gun
Embellishment for Flower Center
Netting  or tulle (optional)
Alligator Clip, Barrette, or Pin

Fabric:
I used poly satin, purchased at Hobby Lobby. For this project you only need 1/8th of a yard, which is the smallest increment you can purchase (4.5"). It ends up costing $0.37 for that amount. 1/8th of a yard is enough fabric to make at least 3 flowers, possibly 4 depending on how many layers you use--great deal, right?! You can use other sorts of synthetic fabrics. Just look for the shiny kind. Isn't the black and hot pink zebra pattern fun? I found that at walmart. It isn't as stiff as the satin and was a bit harder to work with, but still usable. You may also want to get some matching tulle or some sort of netting, which is fun to layer in. Again 1/8th of a yard will be plenty.

Now that you have your supplies gathered, let's get started.


Cut off the selvage. This will make a straight line to work with. Don't worry that the top and bottom lines (the ones cut at the fabric store) are crooked. We'll fix that later.


Line up straight edge on your cutting mat. Make your first cut at 3.5".


Continue cutting strips. Each strip will be 1/4" smaller than the previous one. So, your fist strip will be 3.5", the next 3.25", the next 3", and so on down to 2". My green fabric that I am using for this flower is 1/4 of a yard, so my strips are 9" long. If you get 1/8th yard, yours will be 4.5" long.


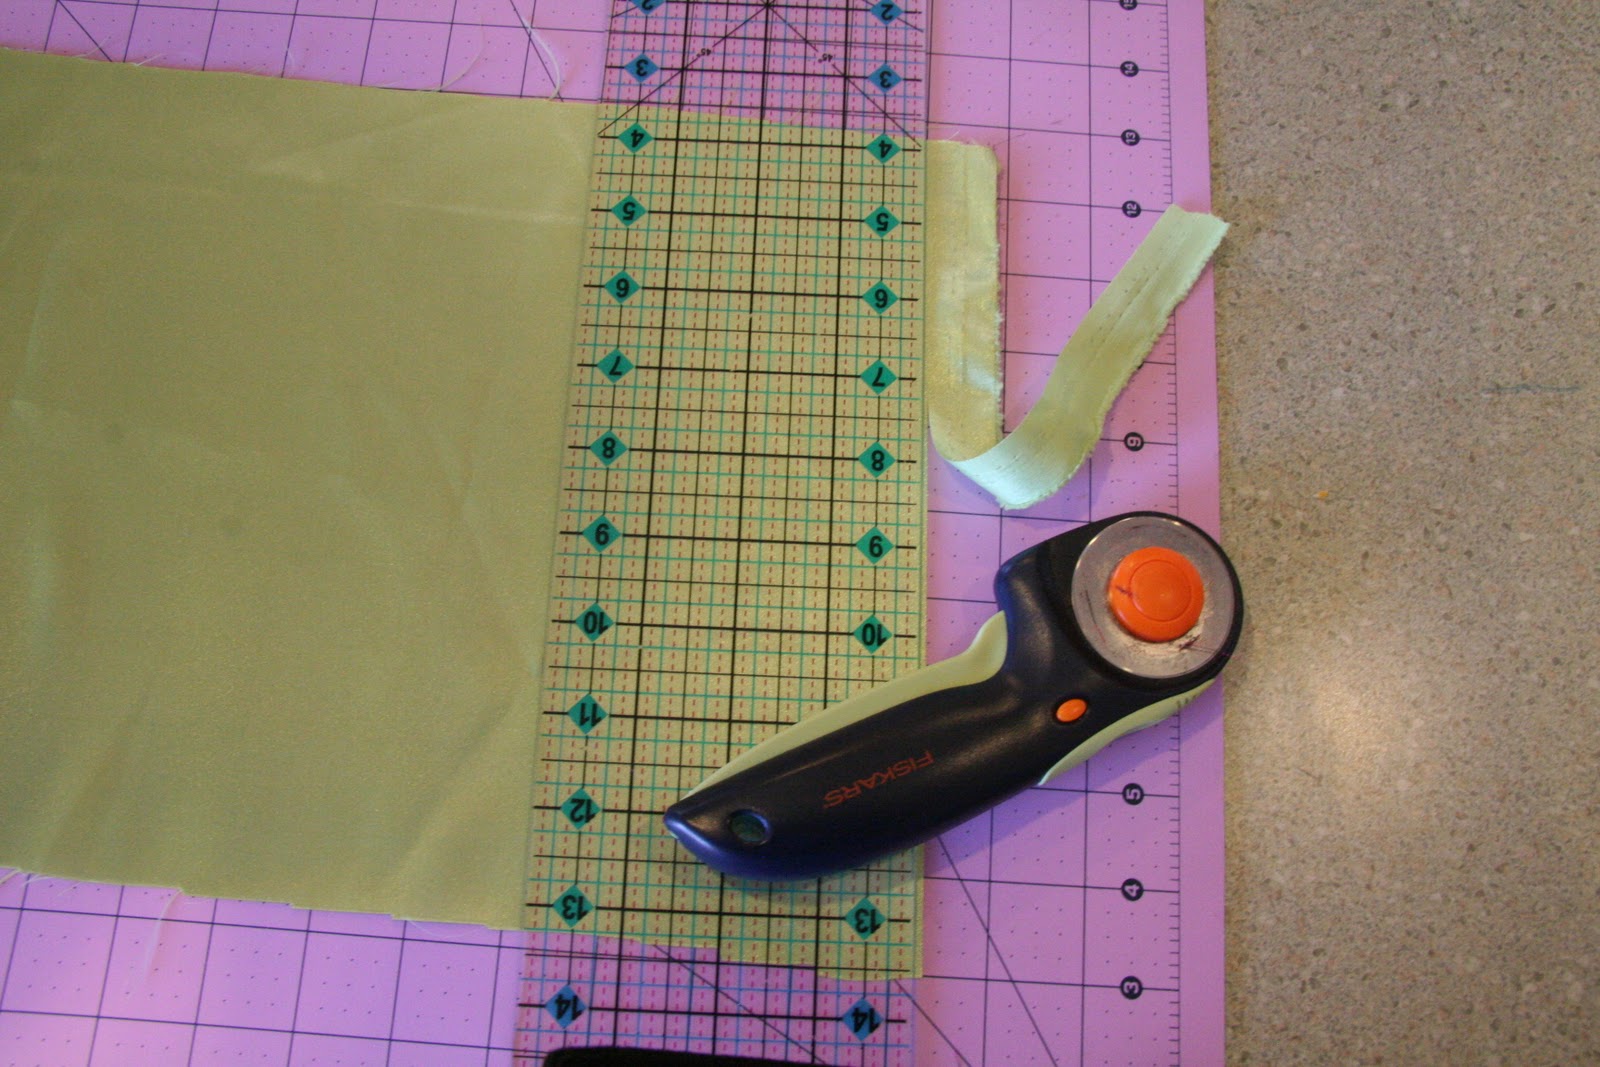
Starting with your largest strip, turn it horizontal, line up the edges on your mat and cut a straight line to square up your fabric. So, in the above picture, you will cut off the jagged scrap on the right of the ruler. Ahhh, nice and straight.


Make another cut, forming a square. Start with your widest fabric and cut a 3.5' square. Do the same to your 3.25" piece and so on. Since my fabric is 9" I am able to make 2 squares, since I am making 2 flowers at once. If you have 1/8th yard, you will only have enough to make one large square, but enough to make 2 squares that are 2.25" and smaller.


Stack your squares. Don't you love the way they look stacked, so nice and neat. 


Starting with the smallest square, trim off the corners (I use my rotary cutter because it's nice and quick) to form a little stop sign shape (octagon). I have discovered that these do not have to be cut round to form round shapes. When you get to the melting stage, they turn into nice little circles. This is the part that really saves time! Like I said, if I can cut it with my rotary cutter, then, yes I will. When I first started making these flowers, I cut the fabric into circles freehand. It took forever and made my hands ache!

If you want to cut the squares into circles, you can. And here's an easy way how.


To make a circle rather than an octagon. Fold the square in half lengthwise and then in half again.

Secure the square with a clip or your finger. Cut a slight curve (almost a half moon shape) off the top outside edge. Unfold to reveal the circle. I actually like to cut my largest 2 or 3 squares this way and all the smaller ones into little stop signs. Minimal use of scissors necessary. 

Now comes the fun part, melting! Sometimes I only have time to get these cut out. I like to cut a bunch all at once. Then I use the alligator clips to secure my stacks of circle/stop signs and set them aside to be melted later. Once you have your pieces all cut out, you should have enough fabric left over to make at least 2 more flowers of the same size.


Carefully melt the edges of your pieces. Here are some additional melting tips:

I like to start with my largest circle so that I can stack them as I go. 

I have found that a wide candle is easiest to work with because you can get down to the side of the flame. I like to hold the fabric next to the side of the flame without actually touching the flame. This way it is easier to control. Working from the top of the flame is more difficult but possible if the only kind of candle you have has a narrow opening on top.  A side note about the candle: I am using on with 3 wicks and alternate which one I light each time I use it. This is why it is wider. Also, find one that has a pleasant light scent (or unscented) so that you don't get an overwhelming headache. I really like this cranberry orange one from Walmart. So do my kiddos!


I have also found that it is easier if the air around you is still so that the flame is less likely to dance around. I tried doing this once with a ceiling fan on and kept burning the fabric in placed I didn't want it to be burned.

For the smaller stop sign shapes, I like to hold them with a pair of needle nose pliers to minimize burning my fingers. 

With the little stop signs, start burning the points first allowing them to melt slightly longer than the straight edges. This way you get a nice round shape.

Here they are all stacked.
 
And from above. See, those little stop signs turned out nice and rounded. This cutting method gives you really evenly spaced layers. On this particular flower, I did a light burn. I you like the edges more jagged then burn them slightly longer.

To secure the layers, I use a tiny dab of hot glue between each layer. It holds up very well and is so much easier than sewing (I think). As long as you are nice and neat, it looks just fine

Add an embellishment for the center. Three small pearl beads look nice, and a bag of them is very inexpensive. Buttons and rhinestones are fun too. It just depends on the look you are going for.

For extra flair it is fun to add some netting or tulle between some of the layers or just under the bottom layer. Burning the edges of the tulle is optional, because it won't fray. Sometimes I do, sometimes I don't. Just be aware that it curls up way faster than the satin, so you need to hold it farther away from the flame. You could even add a layer of lace or organza, which I have done too and is very cute.

After the layers are secured, center has been embellished, and the tulle has been added, carefully glue and alligator clip to the back for a hair bow, or a pin. Whatever you want.

...And you're done!

I'd love to get some feedback if you try my methods. Since I figured out how to cut these this way, I can make them so fast! I hope it helps you too. Also, I will soon be posting another variation to get the petals, which are so feminine and pretty.